The materials
For the concrete i used a special casting concrete.
For the inner mold we need:
- plywood (3mm) or other thin wood
- packing tape and painters tape
- glue
- model plaster
- "do and dry" air drying clay
- various tools and a drilling machine
For the mold we can make use of a simple plastic foodcontainers. When you buy chicken legs you'l have one.
THE MORTER
I used this ready-made concrete mixture called "beton fuer Creative" from a German company called "Viva". There are others on the market however. If you are planning a thin thin-walled project, you really nead a high quality concrete. For thick-walled objects you can experiment with your own mixture.
I made a mixture of 1 part cement, 1,5 part sand and some glass fiber, cut from a fiberglass mat i had laying around. In the water i mixed some pva glue. I casted a thin-walled pot and the pot in the foodcontainer. Both demolded after 24 hrs and kept in a very humid environment to cure properly. The result looks very good and shiny smooth. I am really curious about the final strenght.
In general it is important to mix the concrete with as little as possible water. Too much water would have a negative effect on the strength of the material. Add water bit by bit until you have a thick-flowing mass that can be poured.
For questions you can mail to hansiart@upcmail.nl
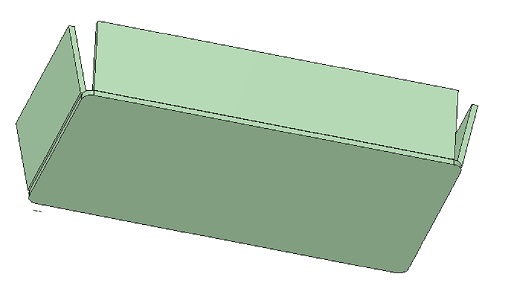
THE MOLD
The idea is to have an inner mold that is re-usable and easy to lift out of the workpiece. Packing the mold in a layer of packing foam (tyhicknes 2mm) is my solution.
I work as follows: First i measure the dimensions of the outer mold. From length and width i subtract the planned wall thickness twice and 2x2mm for the foam skin.
From the height i subtract the bottom thickness, the foam (2mm) and the thickness of the plywood.
Example: We have a mold with bottom 200x100mm and want a wall thickness of 10 mm. We subtract 2 times the thickness (2 x 10 = 20mm) and 2 times the thickness of the foam (2 x 2 = 4mm). The bottom plane of our box is 176 X 76.
I cut this bottom plane from the plywood and rounded the corners roughly.
The mold is 60mm high so our sides are 60 - 10mm (thickness - 2mm (foam) - 3mm (plywood) = 45mm.
I place one side in the same angle as the mold and secure it with UV epoxy. After curing, I glue the entire seam with hot glue. I repeat this for all sides, the result wil look like the photo. Now i close the corners with the do&dry clay. I do this quite generously so that I can later make the curve beautiful by sanding. After all corners are closed, i cast the plaster in. After drying i sand the corners so that they are perfect rounded.
Now it is time to make the skin of foam. This is not attached to the inner mold. First i cut the bottom 1 cm larger than the bottom plane of the mold. And cut strips 2 cm wider than the hight of the box. I attach these strips with elastics around the box. at the onderside i glue them at a few spots to the oversized bottom.The seams come on the short sides. I cut away the excess material and stick the seams with painter's tape. Next i attach the bottom with the painterstape. Now i stick packing tape over the total surface of the foam. This will not attach to concrete.
The last step is attaching the wooden strip on the upperside of the box. I drill the holes in the wood and plaster (carefully) and attach the wood with self-tapping screws. These screws should be as long as possible. Carefull not to crack the plaster. This is best done as the plaster is still somewhat wet, its softer then.
THE CAST
For the casting i mix the concrete powder with just enough water to make it fluid, remember that overwatering will make the concrete weak. Then i cast the mold 1/3 full with the morter.
Now i press the inner mold in place, the morter will rise in the space along the sides. If it is high enough I put a weight on the shelve to keep it in place.
With a thin piece of wood like a skewer i stir in the mold to remove eventual air. Ticking against the sides of the mold will help also.
The ready-made morter i use can be demoulded after 2 hrs but i usually let it be for 6 hrs before I carefully remove the inner mold. This is amazingly easy. If the product is hard enough you can try to press it out of the mold. Now we can place the legs, i suspect they attach better when the pot is still not cured. I put some water in the pot and let it be for some days to allow it to cure.
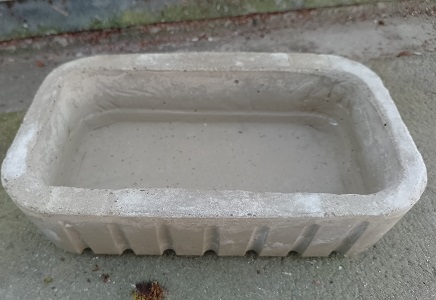
THE RESULTS
The preliminary results are very nice, the workpieces feel solid and look good. In the mold the casted concrete tends to creep up against the walls. After the concrete is set you can cut along the sides to remove these protrusions. The cast with my own mixture looks also very good.