The materials
For the hypertufa we need:
- portland cement (white or grey)
- perlite
- peat moss or coir
These materials are sold in large packs so you have to plan a considerable production. You can't keep cement for a long time, it will harden and becomes unusable.
The first time I decided to use white portland cement, i hope that it becomes more beautyfull than grey.
For the mold we can make use of a simple plastic foodcontainers or a sturdy cardboard box with plastic foil on the inside.
There are many variations possible in the composition and the proportions of the material. You could replace a part of the peat moss by riversand and/or use vermiculite instead of perlite.
THE MORTER
As to the mixing ratio there is a lot to be found on the internet. Normal concrete mixture is cement/sand/pebble 1:2:3, it is not correct to assume that the result will be stronger by adding more cement. Many hypertufa recipes prescribe a mixture ratio 1:1:1, others 3:3:2 and so on.
With the mixing ratio of concrete in mind, my first experiment was made with a composition of 2 parts peat moss, 2 parts perlite and one part portland cement. This gave a satisfactory result but somehow i have more faith in 1.5:1.5:1 or 3:3:2 so this it what i use.
For a larger project (a trough) it is hard to estimate how much morter you need. What I do then is first make a considerable amount of mixed perlite and the other aggregate (peat moss or coir) in a 1:1 ratio. And fiberglass if desired. I can make as much as i want because the surplus can be stored. Later on i only have to mix the portland in, this makes it easier and faster to make extra morter when needed.
A bit of basic arithmetic: The recepy if use is 3 coir, 3 perlite, 2 cement so when we use the pre-mix of perlite and coir, we mix it with portland 6:2 (3:1). The six parts of premix hold 3 parts coir and 3 parts perlite and we mix that with 2 parts portland.
It is important to mix the aggregates very thoroughly. This is best done when still dry. The larger particles in the peat moss must be crumbled because they may cause weak spots in the result. After the dry mixing i added water, bit by bit, to end up with a crumbly mud. Too much water would have a negative effect on the strength of the material. When you make a ball of a well made morter you can only squeeze a few drops water out of it. In this state it is easiest to shape and gives the strongest result.
For questions you can mail to hansiart@upcmail.nl
THE MODELLING
In general it is important that the layer of morter is tightly compressed to make the material as dense and firm as possible. This works better if you model inside a firm mold. But the more sturdy the mold is, the harder it becomes to unmold. Here we have to find a compromise.
The mold properties depend on the method of modeling. When modeling inside the mold you can use a fairly weak plastic object. When modelling on the outside, the mold should be so rigid that it cannot be compressed.
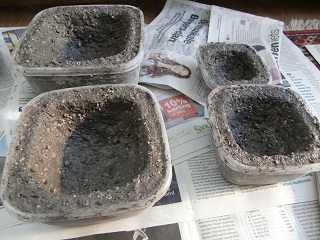
I started with modeling inside the mold so i took plastic food containers. You can grease them somewhat with non-stick foodspray for easy un-molding but i didn't do that the first time.
I started wit pressing a layer of the morter on the bottom, some 2 cm thick, and than i formed the upright sides. I tried to make the thickness even for each side so that the result will be fairly symetric. I did not make the side as high as the mold as this would make the un-molding more difficult.
When the modeling is done, moving the fresh workpiece should be avoided. When you bend the week plastic mold, a crack may occur in the workpiece.
Next i carefully packed the objects in a plastic bag to prevent them from drying. They will be left alone for at least 24 hours to get an initial cure.
THE CURE
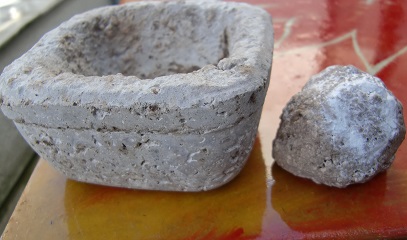
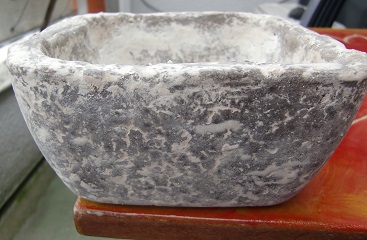
After 24 hours i tested the strenght of the workpiece with a fingernail. When strong enough you can't scratch it. Now you can carefully unmold it. This is the moment to do some post-processing. With a stanley knive i was able to cut the edges to round them off. The workpiece has a smooth surface at the outside, with many gaps in it. I decided to give one of the pots a dry rub with pure portlandcement. Curious what this will do at the end.
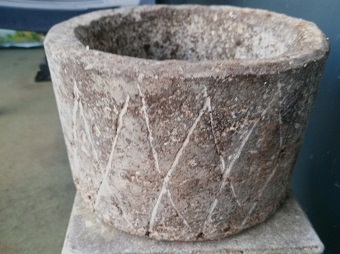
There are many ways to finish the surface, you can scratch figures in it with a knive, you can brush it with a wire brush, use a diamond file to file the edges, etc.
The other workpieces didn't get the dry rub. I packed them in plastic after spraying them with water. One day later i placed the pots under water as i had read somewhere that this would be better for the curing process. I stacked some of the pots in a bucket with aluminiumfoil between to prevent them to grow together. After a weekend i found that the aluminium completely had dissapeared and a smooth slimy haze was formed on my pots. The pots in the water without aluminium foil didn't have this haze. This seemed interesting to me, what is the composition of this haze and how will it influence the end result? So I placed some of the pots in another bucket with aluminiumfoil between. See what will happen. Now patience is required, 28 days seems to be be a good period to leave them in the water. This would give optimal strength to the pots.
THE RESULTS
The preliminary results are encouraging, the workpieces feel solid and look good. The workpieces out of white portland are light colored, not white though. With grey portland i get a color like the picture below.
I am very curious about the final looks of the pieces with the aluminum foil. On the internet i found what reaction is taking place and that this is not conductive to the strength of the pots.
I couldn't wait for the result so i started to make some other objects. This time i modeled the objects in the reversed way. I took some stainles steel kichen bowls because these molds have to be rigid. Now the mold is at the inside so that the outside is the hand modeled side. I liked the inside texture of the other pots so now i have that on the outside. It is much more difficult to work in this way, when you compress the morther to get a firm layer, it will extrude. When i doesn't fit around the mold anymore, pressure on the model may couse cracks.
After the initial cure i saw many weak spots in the pieces so i had to repair them. Also i rubbed the inside with portland as such that there are no pores anymore. Hopefully this can contribute to the final strenght. Maybe even seal the bowl so that it can be used as a birdbath. I think i have to let these bowls cure long in water.
What i learned with this reversed mold method is that you have to work very thorough and patience because it is difficult to form a sturdy and dense layer of uniform thickness around the mold.
I filled the cured pots with water, this would help to get rid of some harmfull salts (like lime) from the hypertufa. The pot that i rubbed on the in en outside looks watertight, so this seems defenitly a way to seal the hypertufa. Hopefully this also applies to the single-sided rubbed pots.
OTHER PRODUCTS
With the leftovers of the morter i modelled some mushroom hats. The stems i made by tapping the morter in plastic cylindershape packing material. After 24 hrs of curing i could cut these cylinders into club-shaped stems. I joined them after some weeks of curing.
After a (not very harsh) winter:
I am not impressed by the growth of my plants, i used peat moss in some pots. It seems to me that this is maybe too much acidly, or the aluminium has a negative effect on plants. It also seems that succulents do not like acid. My next experiments are with coir, and no peat moss in the soil. See if this improves things.
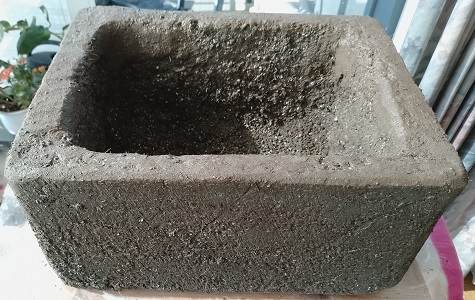
A TROUGH
Here are some thoughts about making a trough. This is a large object that involves a lot of work so it is important to minimize failure. I made one in a cardboard box that wasn't a succes. One side of the trough crumbles so i had to make a new one.
Instead of using a cardboard box I made a sturdy mold (30X40X24cm) from 8mm mdf and pine 30x30mm. I impregnated the mdf with epoxy so that it's somewhat waterresistant and can be used more than once. The unmolding is very easy by just unscrewing the parts. The chance of damages due to the unmolding is almost null.
Furthermore i made the morter with coir and glass fibers, hoping that the trough will be stronger then. I made sure that it was mixed to a homogeneous mass.
I lined the inside of the mold with plastic and modelled the trough with fairly thick walls. When unmolded after 24hrs, fibers can be seen all over the surface so it seems really well reinforced. With a knive i rounded the edges roughly and with a file i smoothed the top edge somewhat. I smeared the slurry from the filing over the worked surface, this will adhere and form a smooth skin. The sides are treated with a wirebrush to imitate the saw marks you often see on original troughs.