This manual applies to various versions of hansiart smart switch. When sensors can be connected (sonoff) this is pointed out seperately.
This Smart Switch is a remote controllable switch that uses your wifi network to communicate with computers, tablets of phones. Once configured, the switch has its own webinterface. You can use this to control the switch and configure other settings, like timers for automated switching. A summary of the possibilities:
Can be switched manually (webinterface of (external) button).
Synchronizes the internal clock with internettime.
Reacts to daylight savings transitions and knows sun- rise/set.
You can configure 4 timers for automated switching.
Various sensors can be connected to the device (*).
Can be used as thermo- or hygrostate, motion- or lightsensor (*).
The switch has a configurable -forgot to switch off- security.
All state information is available on the webinterface.
Can be controlled by other domotica applications (fi. domoticz).
The firmware can be replaced can online (OTA).
Data of sensors can be sent to f.i. Domoticz. (*)
* only Sonoff basic.
Pay attention: To prevent that unauthorized persons can operate the switch, a password has to be set.
This is particularly important when you make the switch accessible from outside your own network.
Global operation:
This internet switch has to be connected with your wifi network.In your netwerk, the switch has an address, the so called IP address. Via this addreas you can reach the webinterface of the smart switch. Once the switch is connected to your network, you can switch in 5 different ways:
via the webinterface with phone, tablet or computer.
with the (vonnectable external) button on the device.
via domotica applications such as Domoticz.
automated through configured timers.
automated by thermostate, hygrostate, motionsensor, lightsensor.
functions of the button on the device:
switch on/off: click the button (the led blinks 1x).
reboot: Hold down. The led blinks 1 time and goes on after some seconds. Release now.
reset: Hold down the button. The led blinks 1 time and goes on after some seconds. Release after the led has gone out. The network credentials are deleted and an accesspoint (AP with address 192.168.4.1) is started so that you can redo the basic configurations. (See 'put into use'). The led is on now.
meaning of the ledsignals:
The led always blinks 1 time when the (external) button is pressed.
If the led is on constantly, no connection with the wifi could be made. The accesspoint is opened. This is normally the case when you never before connected the switch with the wifi. (see 'put in use'). When it was connected before, you can try to reboot the switch via the button.
When the led blinked 3 times, the connection with the wifi is established. You can browse now to its webinterface.
PUT INTO USE:
connect to your wifi metwork
To be able to work, the switch one-of has to be connected to your wifi. This can be done via the configportal. You will see this when you connect to the accesspoint of the switch. This accespoint is setup when the switch cannot connect to the wifi because there are no valid username and ssid available. Follow the next instructions to establish a connection with your network.
preparation
First you have to track down the data of your network. What is the IP address of your router. This you can find out by looking at the IP address of your phone or other wifi enabled computer in your network. Look this up under wifi configuration. When you find an ip address like 192.168.0.12 than the address of the router is 192.168.0.1. Note this.
Find the name (SSID) and the password of your wifi, so that you have it at hand. Via google you can find the lattitude and longitude of your geographical position. This is needed for the calculation of the sunset. The timezone is relative to gmt (+60 minutes for European time). Think up a password or pincode for the switch as you have to secure it.
put into use:
plug it into the wall outlet. The green led goes on. This means that the accesspoint has been opened. You can now connect your phone/tablet or computer (provided it has wifi) with this AP. Look under WIFI CONFIGURATION of your PC, tablet or phone for available networks. You will see a open network "SONOFF AP-xxxxx" or "ESP DEVICE-xxxxx" in the list. Connect to this network.
Normally spoken, the configuration portal is opened automatically on your internetbrowser. If not, browse to http://192.168.4.1
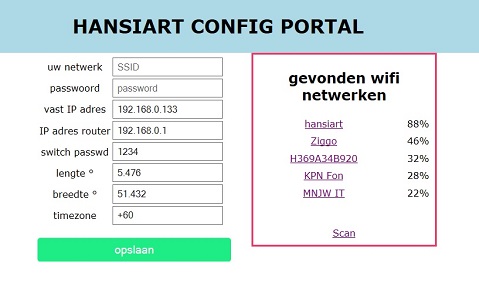
You get to the portal and can fill in the desired data.
You can select your wifi in a list. Note down the IP address and the password that you have entered.
If you are satisfied with the settings then click on 'save'. Now a new page is opened. Here you can see which IP-address you gave to the switch. Note down this address! Now close this page, click'close this page'.
Pay attention: the ip address always begins with 192.168 and is derived from the address of your router. When the address of the router is 192.168.0.1 than you choose an address that begins with 192.168.0.x , eg 192.168.0.123.
If you leave the fields regarding th address empty, an IP is set by the router (dhcp). You can login to the router to check the connected devices to find out the IP address.
Pay attention: check if the provided ip is not already in use by another device in your network!
Connect your pc, tablet or phone back to your wifi. Type the address you noted in the addressline of your browser. When you provided address: 192.168.0.123 than you type 'http://192.168.0.123' in the addressline.
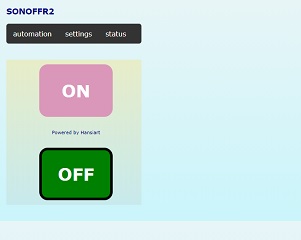
Now you get to the webinterface of your smart switch.
You have to login first (with username 'admin' and your password).
Your device is now ready to use. When you disconnect it from the grid and connect again, the switch will reconnect to thw wifi and blinks 3 times then. The switch will always remember the credentials until you reset it to the AP mode.
SETUP AUTOMATED SWITCHING:
Click on the menu item 'automation'. under construction
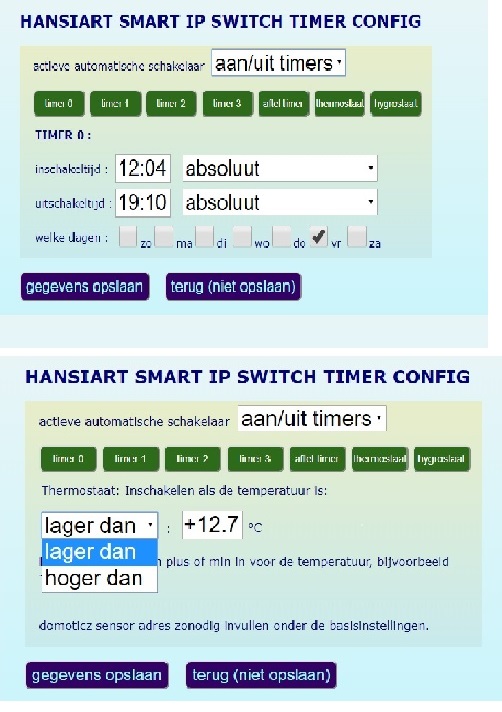
set on/off timers timers
You can activate all timers with the selectbox 'active automation'.
under construction
countdown timer
This timer becomes active when there has been switched on manually ((external) button or webinterface) or by the motion sensor.
Under constuction
set thermostate or hygrostate (only sonoff)
USE OF SENSORS(ONLY SONOFF)
CONNECT A SENSOR: (ONLY SONOFF
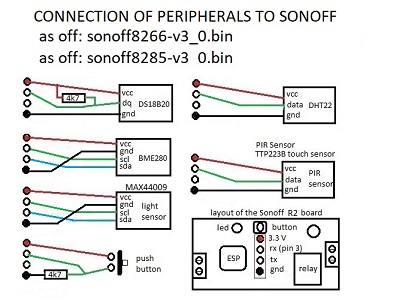
When you want to use a temperature- of motionsensor, it has to be connected to the device. for this a slot may have to be made in the lid. Stab the dupont wires on the pins, from the button: pin1 = vcc (+), pin4 = gnd (-), pin2 = data. You connect a BME280 , seen from the button, pin1 (vcc +), pin 2 (scl), pin3 (SDA), pin 4(gnd). See the picture.
In the menu 'settings' you have to sign up the sensor. Beware! Always disconnect from the grid when working on the Sonoff !!!
TEMPERATURE SENSOR:
When you connected and signed up a temperature sensor you have ubder 'automation' the option to setup a thermostate or hygrostate. When you provided a valid address where to send the sensordata, this will be sent every measuring moment.
MOTIONSENSOR:
When you signed up a motionsensor, the on-time is equal to the on-time of the count down timer. You thus have to provide a value there.
Under construction
What happens when de motionsensor is triggered, can be set under 'automation - motionsensor'. You can choose from 5 scenarios.
Under construction
LIGHTSENSOR
Under construction
EXTERNAL TACTILE BUTTON / TOUCH SENSOR
Under construction
GENERIC DIGITAL SENSOR
Any sensor that can work at 3.3V and has a discrete output ("0" or "1") can be used, for instance a rain sensor. The switch behaviour can be set. Should be switched on when the sensor is high, or just the opposite. I tested this with a rain sensor but for instance a sound- or tilt sensor would work the same way. We can switch on/off dependant on the sensor readings or just sent a message to Domoticz.
INFORMATION PAGE:
Under construction
ACCESS FROM ANYWARE ON THE PLANET:
Under construction
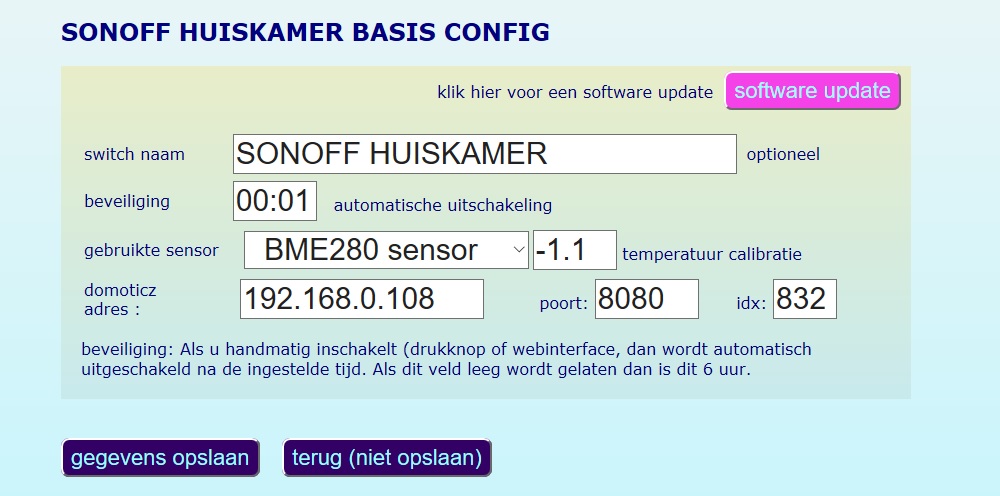
CHANGE THE BASIC CONFIGURATION:
Under construction
CHANGE SETTINGS
Under construction
set motionsensor (only sonoff)
Under construction.
Beware: When no motionsensor is connected but yet this sensor is signed up, unwanted effects can occur.
picture 4
grant a user:
The administrator can set a user password and give this to others. They can log-in then, but have limited privileges. The user can log-in with 'user' and password. The user can only switch and set timers.
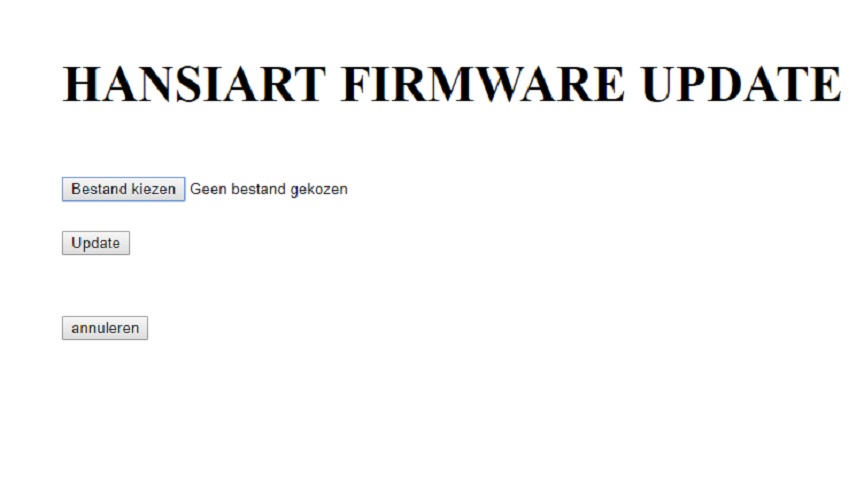
SOFTWARE UPDATE:
Under construction
switch with domoticz:
The device can be switched with a link. this link has the form ipaddress/SW=ON. This link you can provide to your domoitca applications . For instance 'http://192.168.0.123/SW=ON'
to switch off the link has to contain 'SW=OFF' rather than 'SW=ON'.
data sending to domoticz:
The results of measuring by sensors can be sent to domoticz. When u connected a BME280 than the folowing data will be sent:
value=T;H;HS;P;F
T = temperature fi 20,7
H = humidity fi 34
HS = 1, 2, 3 of 4. 1 = 45-70% (comfortable), 2 = < 30% (dry), 0 = between 30-45% (normal) 3 = >70% (wet)
P = pressure (bijv 1025,4)
F = prediction 1 2 3 4 ( 1 = high (sunny), 2 = half clouded 3 = clouded, 4 = low (rain).
When the motiondetector triggers is value=1;" sent. When the countdowntimer
subsequent switches off a "value=0" is sent. Also when is switched via the pushbutton, the message mentioned above is sent. When you configured a lightsensor, the measured amount of lux is sent.
When you don't want anything to be sent then fill in an invallid domoticz address.
solve problems:
The led on the switch stays on.
This means that there is no wifi connection. Try to reboot the switch see (workking of the button" in chapter 1).
See to it that there is sufficient wifi signal strength at the location of the device. When the led stays on after a reboot, you have to follow the instructions under the chapter "put in use".
forgot password
When you have forgotten to set a password, than it is default '0000'. (4x0). You can reset to AP mode (see 'chang wifi settings') to provide the password in the configportal.
webinterface no show
Check the ip address that you typed in your browser is correct. Reboot or reset to AP to check the settings.